Silicone Bed Spacers
Because the tolerance on the aluminum spacers installed by Sovol can vary by a lot it is difficult to level the bed with a tolerance of 0.2mm which should be the maximum.
To fix that you can swap them with silicone spacers. This guide for Prusa printers covers the general ideas about the modification but there are some differences with the SV06.
You can choose between a silicone tube or standard silicone bed spacers used on other printers. In any case you will need to cut them down to size.
Silicone Tube

Silicone tube should be at least 8mm outer diameter and 3mm or 4mm inner diameter. 3mm fits very tight on the screws.
You can buy silicone tubes from Amazon, AliExpress or search for them locally. Just make sure they're high temperature tubes!
Standard Bed Spacers
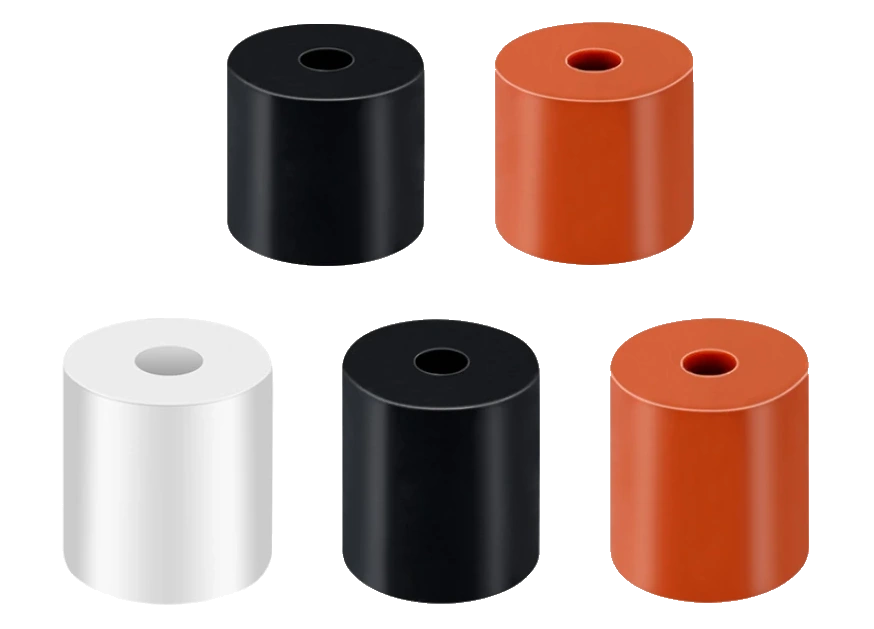
Alternatively you can buy typical silicone bed spacers used on 3D printers, widely available on Amazon, AliExpress or your favorite 3D printing store.
Make sure that they're not more than 4 mm diameter for inner hole and at least 10 mm tall (typically they will come in 16mm and 18mm). You need 4-5 pieces for SV06 or 4-8 pieces for SV06 Plus.
These spacers are thick and will be more difficult to cut straight. They don't compress as easily as the tube and you'll have to cut them to length.
Cutting Jig

Print a cutting jig to make the spacers evenly sized and the cuts straight. There's an SV06 specific jig that cuts the spacers to 12mm length which gives you more room for adjustments on Printables. The jig for the Prusa mod cuts the tubes to 9mm length.
Replace Spacers
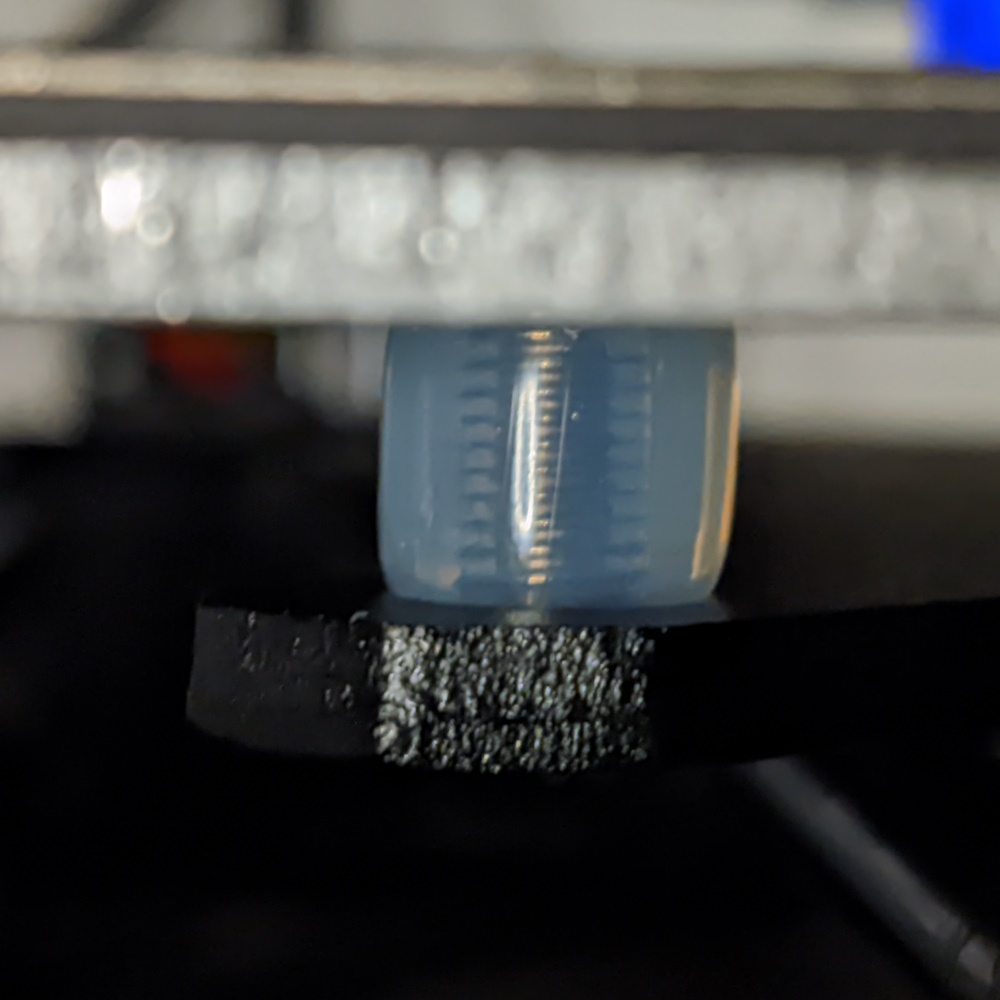
Remove the PEI plate and unscrew the bed from the bed carriage.
Remove the outer 4 original spacers and replace them with silicone. It is recommended to keep the original middle spacer stock to have a baseline.
Screw the bed plate back using the middle screw first. Tighten it well then proceed to tighten the remaining screws with silicone. You will need to apply force since we want to compress the tubes slightly. If this is too difficult you will need to replace stock screws with longer ones.
You can use one of the stock spacer to help you hit close to the baseline height or print a helper jig with same height as your middle spacer. Or just eyeball it and fix it later...
SV06 Plus Specific
On the SV06 Plus there are 8 screws which complicate your choices.
You can opt to keep the middle 4 spacers stock. Measure the aluminum spacers and select the 4 that are identical in size or close to it. Replace the outer 4 spacers with silicone.
If this doesn't yield a satisfactory bed level you can replace stock spacers with silicone one by one. You may end up having two stock ones diagonally or ends up on only one. In any case it doesn't matter how many you've replaced as long as you get a nice and level bed.
Mesh Visualization
To adjust the bed screws you'll need to have a visualization of the bed mesh to know whether to tighten or loosen the screws. Choose on of the following options:
Pronterface
Pronterface is a portable program for Windows or MacOS to control your 3D printer via its serial interface. If you don't use OctoPrint or Klipper this is the simplest way to visualize the bed mesh.
Download Pronterface to the computer. Connect the computer to the printer with a data USB cable.
Warning
Use a good quality data USB cable. It is highly recommended to block the V pin on the USB cable to prevent power backfeeds and damage to electronics. How to tape it over. Alternatively you can purchase an USB power blocker (Amazon)
Start Pronterface and connect to the Port associated with the 3D printer.

We will use the Command to [S]end input field and issue the following commands:
- First home the printer:
G28 - Heat the bed to standard printing temperature, in this case 60°C:
M190 S60(change the number afterSfor a different temperature) - When the bed heats up, start bed leveling:
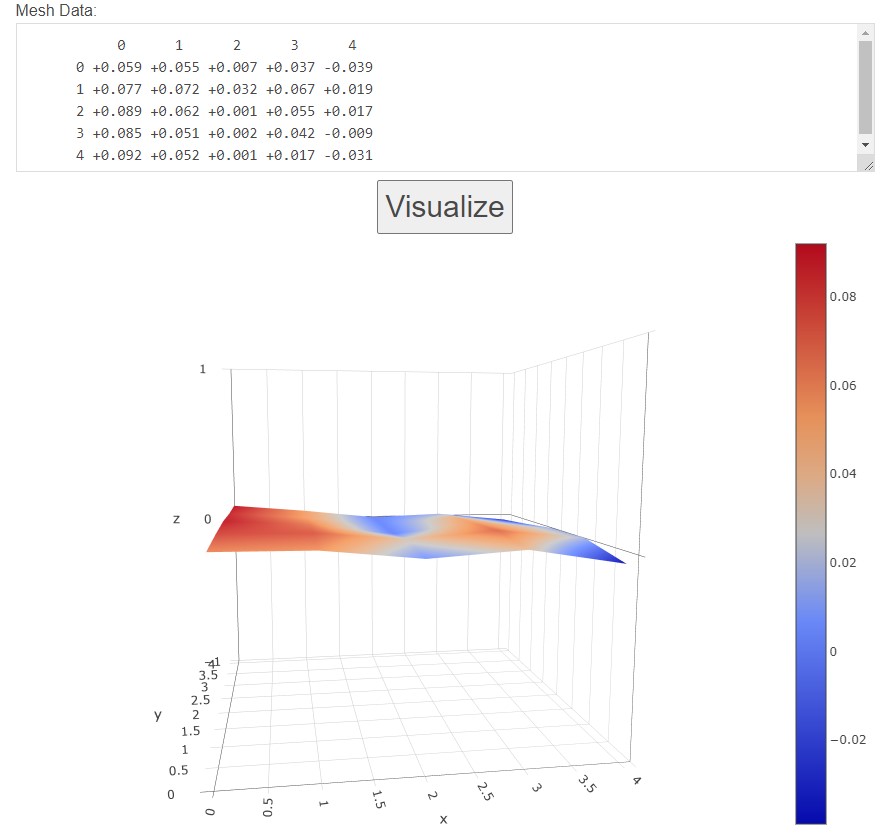
G29 - When the leveling is complete the console window will display an array of numbers.
Recv: 0 1 2 3 4 Recv: 0 +0.059 +0.055 +0.007 +0.037 -0.039 Recv: 1 +0.077 +0.072 +0.032 +0.067 +0.019 Recv: 2 +0.089 +0.062 +0.001 +0.055 +0.017 Recv: 3 +0.085 +0.051 +0.002 +0.042 -0.009 Recv: 4 +0.092 +0.052 +0.001 +0.017 -0.031 - Copy them and paste the result into the online bed mesh visualiser. Remove the
Recv:from every line and click Visualize.
Octoprint
On Octoprint install the Bed Visualizer plugin. It will do most of the work for you and display a bed mesh with a single click.
Open settings and navigate to Plugins -> Bed Visualiser. Paste the configuration for bilinear leveling if using original firmware:
M140 S60 ; starting by heating the bed for nominal mesh accuracy
M117 Homing all axes ; send message to printer display
G28      ; home all axes
M420 S0  ; Turning off bed leveling while probing, if firmware is set
         ; to restore after G28
M117 Heating the bed ; send message to printer display
M190 S66 ; waiting until the bed is fully warmed up
M300 S1000 P500 ; chirp to indicate bed mesh levels is initializing
M117 Creating the bed mesh levels ; send message to printer display
M155 S30 ; reduce temperature reporting rate to reduce output pollution
@BEDLEVELVISUALIZER ; tell the plugin to watch for reported mesh
G29 T      ; run bilinear probing
M155 S3  ; reset temperature reporting
M140 S0 ; cooling down the bed
M500 ; store mesh in EEPROM
M300 S440 P200 ; make calibration completed tones
M300 S660 P250
M300 S880 P300
M117 Bed mesh levels completed ; send message to printer display
Find the plugin in the dropdown menu:

Click on Update Mesh Now and wait until its complete. Your bed mesh will be displayed in the plugin tab.
SV06 Plus
On SV06 Plus the screen will be stuck on the bed leveling screen. Once you're done you will need to restart the printer to clear the screen.
Klipper
Open "Tune" menu in the sidebar and start calibration.
Adjust the Bed
Inspect the mesh produced and adjust the screws to level out the differences.
Repeat the mesh visualization process until satisfied with your bed level. Variances smaller than the usual layer height you print in is considered good. With enough patience you can bring the variance below 0.1mm which is amazing.
OCD Level
If you want an extremely level bed with variances as low as 0.0045mm get some Kapton tape (Amazon , AliExpress). The tape is usually just 0.1mm thick and will help you patch the problematic spots that cannot be fixed with simple screw adjustment.
You can apply the tape to the PEI sheet if you swap them often or to the magnetic sticker if you use the same sheet all the time.